
Most beginners print a stack of calligraphy practice sheets, fill two pages, and never touch the rest. The sheets are not the problem. Using them without a plan is.
This guide is part of Getting Started with Calligraphy. You will learn what a good sheet includes, which kinds to choose, how to practice with them, and how to move on without guides.
I still have the first alphabet sheet I ever filled in, ink blotches and all. Those messy rows taught me more than any finished piece, because I could see my progress line by line.
Why Calligraphy Practice Sheets Help
A practice sheet gives your eyes something to measure against. Without guides, letters drift: some are taller, some lean more, and some sit higher on the line. Sheets fix that, so you can spend your attention on the pen instead of on the page.
Printed calligraphy worksheets also keep your practice organized. You know what to draw next, so you waste no time deciding.
What Should Calligraphy Practice Sheets Include?
- Guidelines: baseline, x-height, and slant lines (explained below).
- Stroke drills: rows of lines, ovals, and loops to repeat.
- Letters: the alphabet shown in the style you are learning.
- Spare space: blank guided lines so you can write on your own.
- Clear spacing: enough room that your hand does not feel cramped.
How Do Slant, Baseline, and X-Height Lines Help?
The baseline is the line your letters sit on. The x-height is how tall the small letters are, like a, o, and x, without any tall or hanging parts. Slant lines are angled lines that show how far your letters should lean.
Together they keep your letters the same size and tilt. Different styles use different slants, so use the sheet made for your script. Mixing them is a common reason for uneven results.
Tall letters like l and d reach above the x-height, and letters like g and y drop below the baseline. Many sheets mark those extra lines too. If yours does not, you can add them with a pencil and ruler.
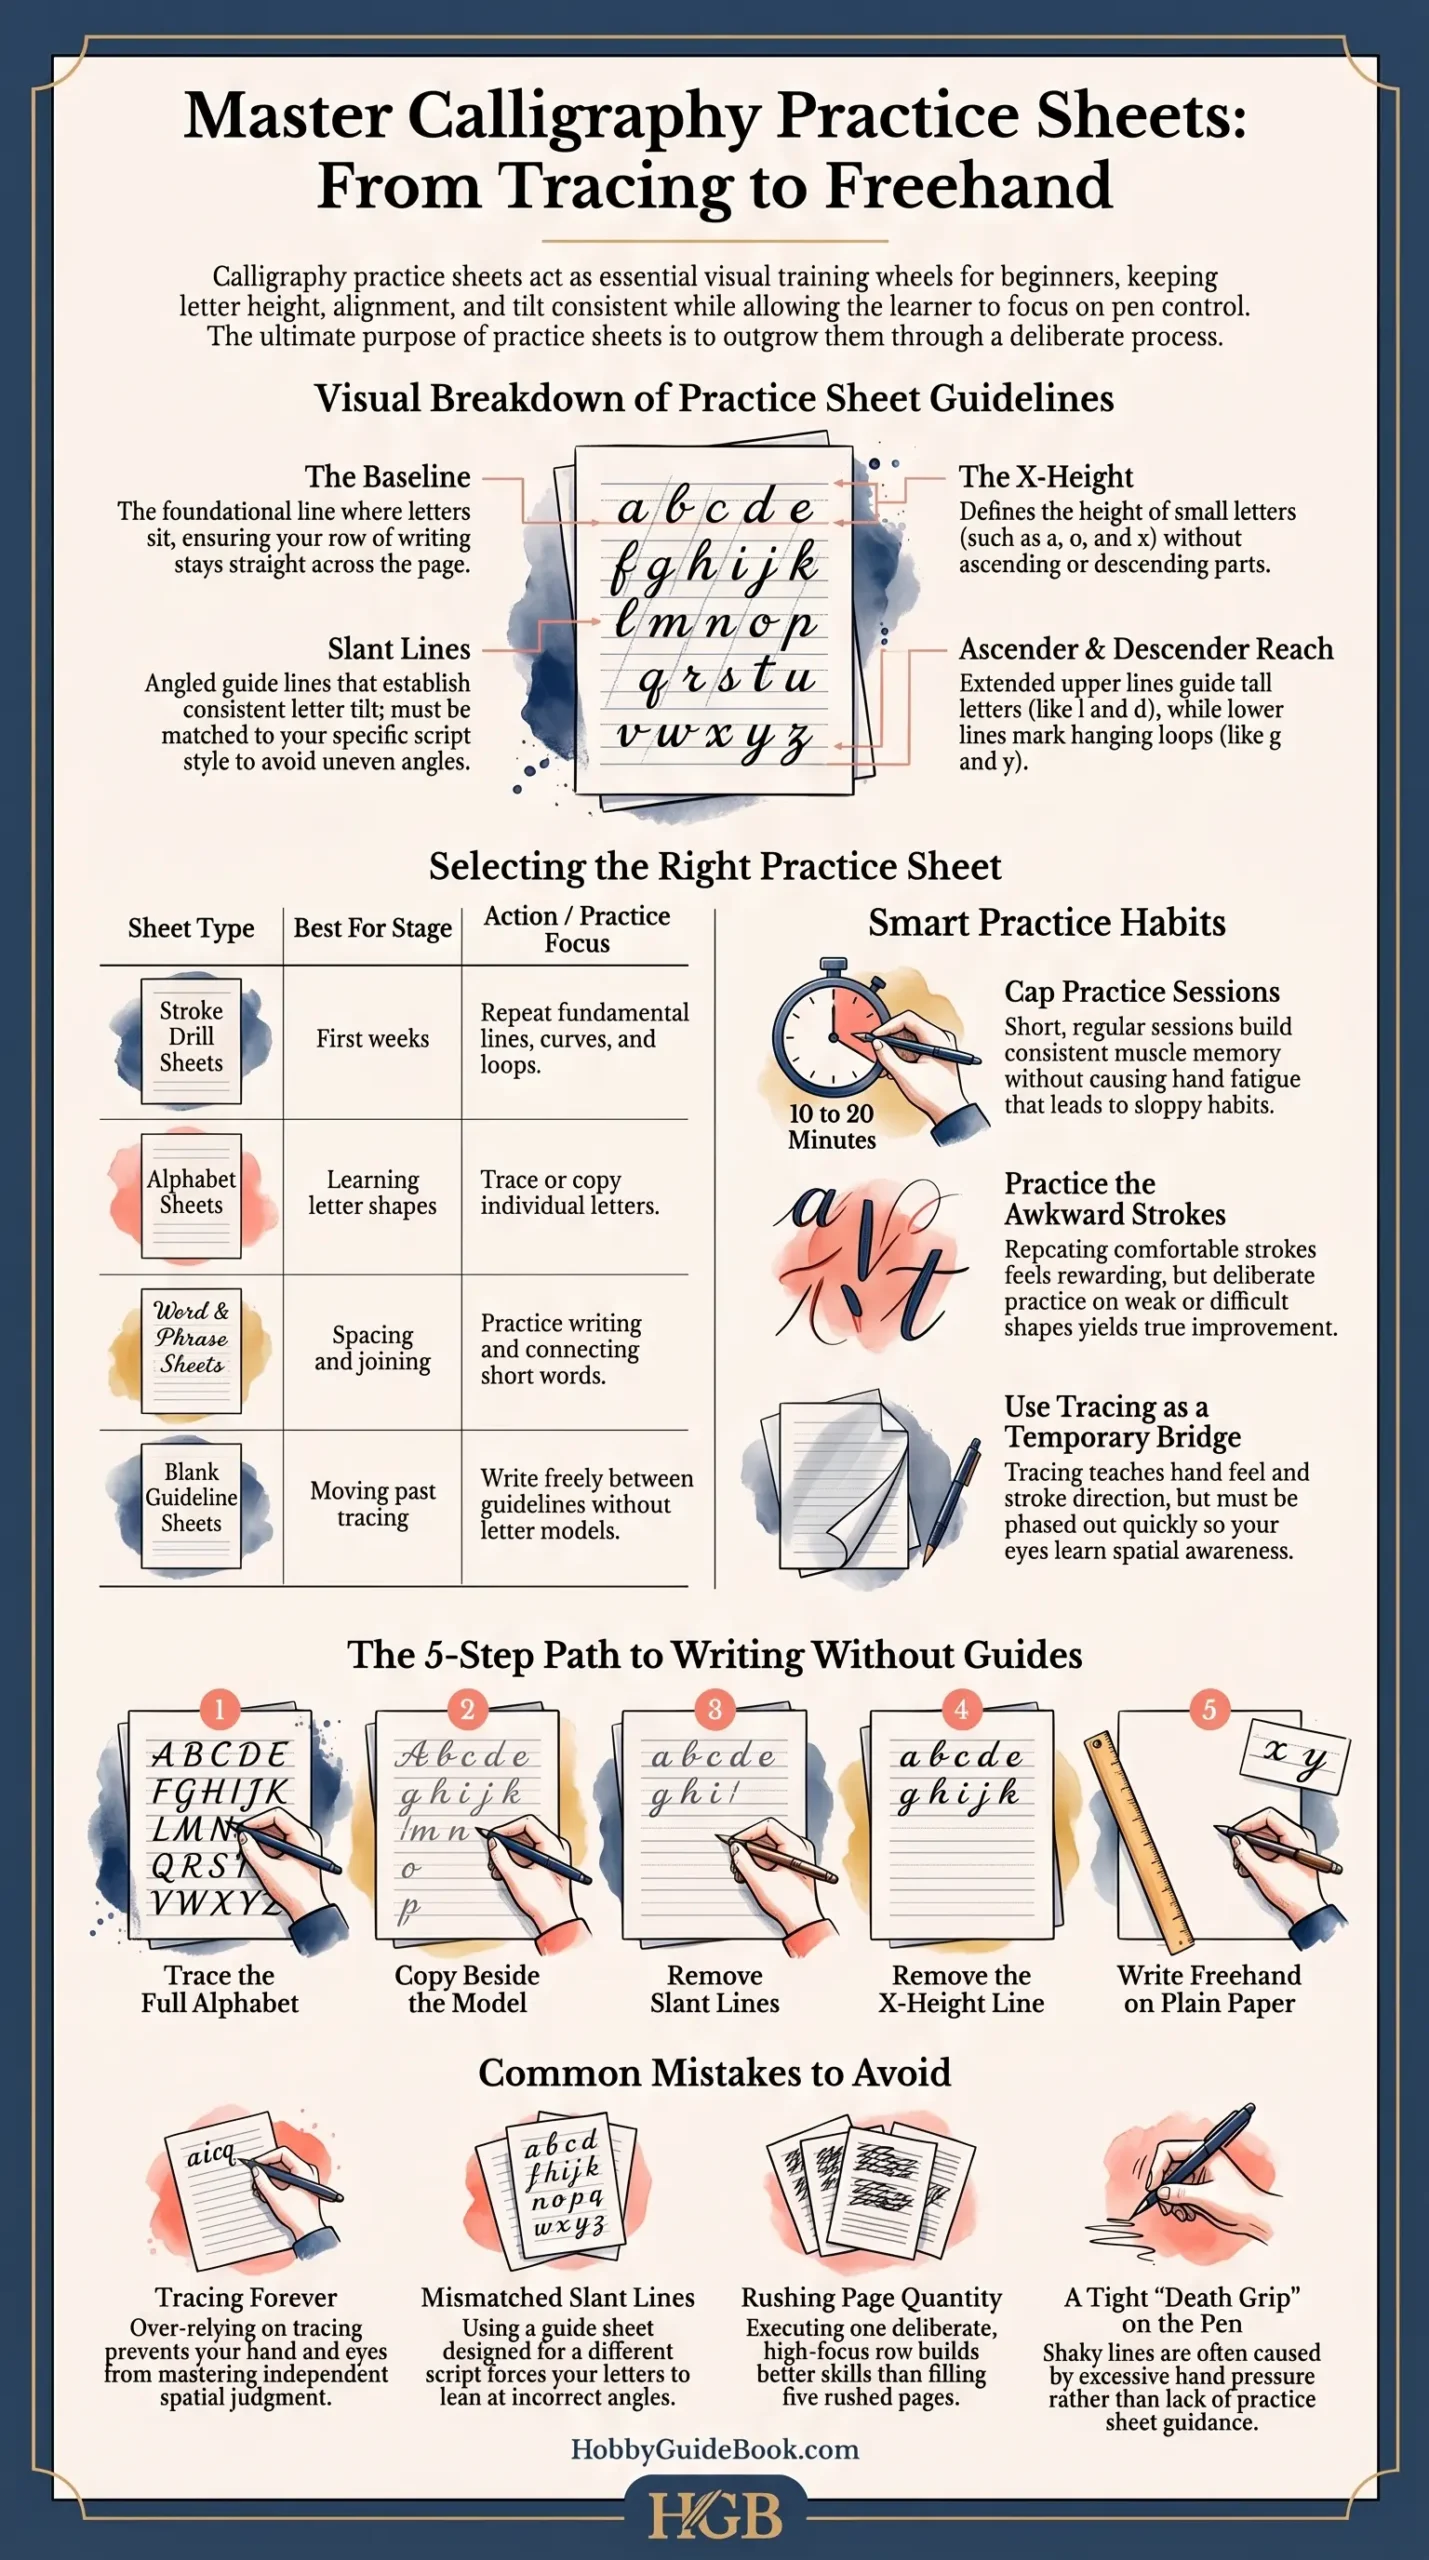
Photo Credit: Hobby Guidebook Editorial
Types of Practice Sheets
Not every sheet does the same job. Pick the type that matches where you are right now.
|
Sheet type |
Best for |
What you do |
|
Stroke drill sheets |
First weeks |
Repeat lines, curves, and loops |
|
Alphabet sheets |
Learning letter shapes |
Trace or copy each letter |
|
Word and phrase sheets |
Spacing and joining |
Write short words in a row |
|
Blank guideline sheets |
Moving past tracing |
Write freely between the lines |
Start with printable calligraphy drills for strokes. If you have not tried them yet, read basic strokes every calligrapher should practice first, then match each drill to a sheet. When you reach letters, the calligraphy alphabet practice sheets reference lists sheets by script.
One practical tip: thin printer paper can let wet ink spread or soak through. Test a line first. If it bleeds, use smoother, heavier paper and place the guide sheet underneath, so you can see the lines through the top page.

Photo Credit: MART PRODUCTION
Should Beginners Trace Calligraphy Practice Sheets?
Yes, at the start. Tracing teaches your hand the shape and the direction of each stroke. It is a fair way to build muscle memory when you do not yet know what a good letter looks like.
But tracing alone will not teach you spacing or decisions. Use it as a short step, then copy letters beside the model, then write them from sight.
How Often Should You Practice?
Short, regular sessions of 10 to 20 minutes tend to work well for beginners. Longer sessions are not always better, because a tired hand picks up bad habits. For more on pacing, see the calligraphy practice routine guide.
Many people notice steadier lines within a few weeks of regular practice, though it varies from person to person.
Practice the part that feels awkward, not the part that feels good.
That advice gets repeated among calligraphers because it is easy to ignore. Repeating your best stroke feels nice, but it does not improve the weak ones.

Photo Credit: cottonbro studio
Moving From Practice Sheets to Writing Without Guides
Switch slowly. Here is a simple path:
- Trace the full alphabet until the shapes feel familiar.
- Copy letters beside the model, still on a guided sheet.
- Remove the slant lines, but keep the baseline and x-height.
- Remove everything except a baseline.
- Write on plain paper, checking your work with a ruler.
If your letters fall apart at a step, go back one. That is normal, not a failure.
Common Mistakes to Avoid
- Tracing forever. Your hand never learns to judge space on its own.
- Using the wrong slant sheet. Your letters will lean the wrong way for the style.
- Rushing a full page. One careful row beats five sloppy ones.
- Ignoring your grip. Shaky lines can come from a tight hold, not the sheet.
Frequently Asked Questions
What should calligraphy practice sheets include?
Guidelines, stroke drills, letter models, and blank guided space to write on your own.
How do slant, baseline, and x-height guidelines help?
They keep your letters the same size, height, and lean from one letter to the next.
How often should you practice with calligraphy worksheets?
Short sessions of 10 to 20 minutes, several days a week, are a good starting point.
Should beginners trace calligraphy practice sheets?
Yes, for a short time. Then move on to copying and writing from sight.
How do you progress from practice sheets to writing without guides?
Remove guidelines one at a time, starting with slant lines. Finish on plain paper with only a baseline.
Use the Sheet, Then Outgrow It
Practice sheets are training wheels, and the goal is to take them off. Pick one type, give it a few weeks, and let your own rows show you when it is time to change.
When you are ready for the bigger picture, read the full calligraphy & hand lettering guide.





Leave a Reply