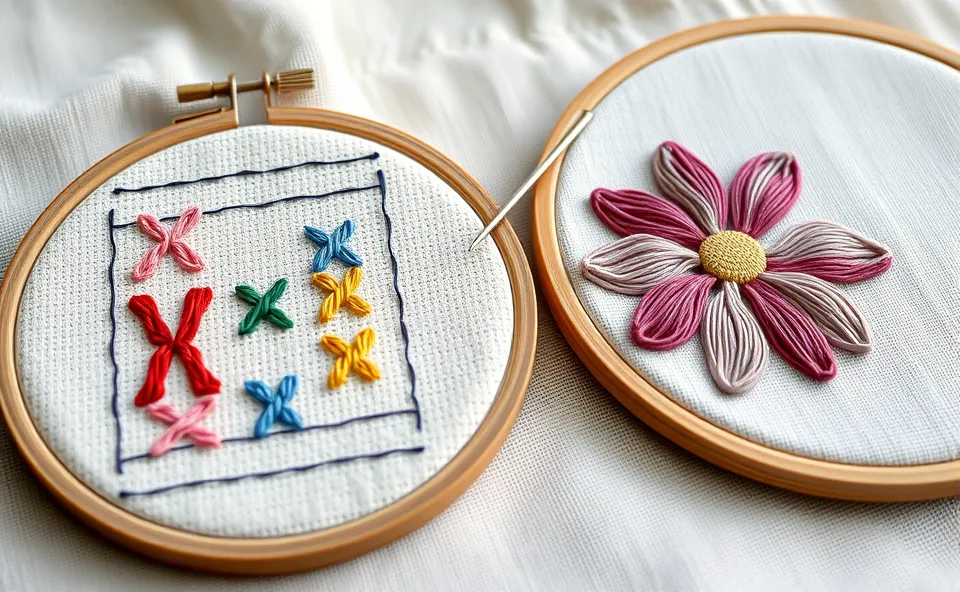
The first time you pull a threaded needle through fabric and watch a single stitch sit there, solid and real, something clicks. That’s the moment most people get hooked on needlework, and it’s the same moment whether you’re learning embroidery or cross-stitch. This guide covers everything you need to understand both crafts, from what they actually are to how to pick up a needle and start.
Embroidery and cross-stitch are two hand needlework crafts that use thread and a needle to add pattern, texture, or pictures to fabric. Embroidery covers a wide range of decorative stitches you can place freely across a design. Cross-stitch uses one small X-shaped stitch, repeated over and over on a counted grid, to build a picture one square at a time. Both start with the same basic tools: fabric, thread, and a needle.
By the end of this guide, you’ll know the difference between the two crafts, which stitches and tools to learn first, and where to find deeper guides on techniques and beginner projects.
Two Crafts, One Family
Embroidery and cross-stitch often get lumped together, and it’s easy to see why. They both use needle and thread on fabric. They share some tools. Many people who love one eventually try the other.
But they’re not the same thing. Embroidery is the broader category. Cross-stitch is one specific technique that sits inside that larger family. Think of embroidery as the whole toolbox and cross-stitch as one very popular tool inside it.
This guide gives you a full overview of both. For deeper dives into specific stitches or your first project, you’ll find links throughout to more detailed guides.
What Is Embroidery?
Embroidery is the general practice of decorating fabric using a needle and thread. It’s not one stitch or one method. It’s an entire family of techniques that includes dozens of stitches, each with its own look and use.
With embroidery, you usually work freehand or from a printed or traced design. You’re not restricted to a grid. A single project might combine several stitches: a satin stitch to fill in a solid shape, a stem stitch to outline a curved line, and a French knot to add small dots like flower centers.
This freedom is part of what makes embroidery for beginners so approachable once you learn a handful of core stitches. You don’t need to master all of them before you start. Most embroiderers begin with three or four basic stitches and build from there.
Embroidery can be done on almost any woven fabric, from cotton and linen to denim and canvas, which is part of why it shows up in so many places: clothing, home decor, quilts, and standalone hoop art.
What Is Cross-Stitch?
Cross-stitch is a specific type of counted embroidery. Instead of stitching freely, you work from a chart, which is a grid made of colored squares that map out exactly where each stitch goes and what color thread to use.
The main stitch in cross-stitch is, unsurprisingly, the cross stitch itself: two diagonal stitches crossed to form an X. Repeat that X across a grid, using different thread colors for different squares, and a picture slowly appears. It’s a bit like painting by numbers, except every “pixel” is a small X made of thread.
Cross-stitch is almost always worked on even-weave fabric, most commonly Aida cloth, which has a clear, countable grid of holes woven into it. That grid is what makes counting stitches accurate and consistent.
Because the process is so structured, cross-stitch for beginners tends to feel more predictable than freehand embroidery. You’re not deciding where each stitch goes. You’re following the chart. That structure is part of what makes it a popular entry point into needlework.
Embroidery vs. Cross-Stitch: Key Differences
Here’s a side-by-side look at how the two crafts compare.
| Feature | Embroidery | Cross-Stitch |
| Stitch variety | Many different stitches | Mainly one stitch (the cross stitch), plus backstitch for outlines |
| Design approach | Freehand or traced design | Follows a counted chart |
| Typical fabric | Cotton, linen, canvas, and more | Aida cloth or other even-weave fabric |
| Skill focus | Stitch technique and tension | Counting accuracy and following a chart |
| Common results | Pictures, lettering, decorative borders | Detailed pixel-style pictures and samplers |
Quick answer: the main difference is that embroidery uses many stitch types placed freely, while cross-stitch uses one repeated stitch worked from a counted grid.
A Short History of Embroidery and Cross-Stitch
People have decorated fabric with needle and thread for a very long time, across many different cultures and regions. Exact origins are hard to pin down, and the honest answer is that needlework traditions developed independently, and side by side, in many parts of the world, each with its own stitches, motifs, and materials.
Embroidery, broadly, shows up throughout recorded textile history as a way to add status, meaning, or decoration to clothing and household items. Different regions developed their own signature stitches and styles, and those traditions continue to influence embroidery today.
Cross-stitch has a long association with sampler-making, a practice where stitchers, historically often young learners, worked rows of stitches and letters onto fabric as a way to practice technique and record patterns for future reference. Sampler styles and conventions varied by time period and region, so it’s worth treating any single “history” of cross-stitch as one thread in a much larger, more varied story rather than a single fixed timeline.
Today, both crafts are practiced worldwide, blending traditional techniques with modern patterns, fabrics, and tools.
Stitches and Techniques
You don’t need to know dozens of stitches to get started. A small set of core stitches covers most beginner projects in both crafts.
Common embroidery stitches include:
- Running stitch: A simple line of even, small stitches. Often the very first stitch beginners learn.
- Backstitch: A solid, unbroken line, useful for outlines and lettering.
- Satin stitch: Straight stitches placed closely together to fill in a shape.
- Stem stitch: A slightly twisted line stitch, good for curves like flower stems.
- Chain stitch: Looped stitches that connect like a chain, useful for both lines and filling.
- French knot: A small, raised dot, often used for flower centers or texture.
Common cross-stitch stitches include:
- Full cross stitch: Two crossed diagonal stitches forming an X, the main building block of a design.
- Half stitch: A single diagonal stitch, used for shading or soft edges.
- Quarter stitch: A partial stitch used for fine detail, especially curves.
- Backstitch: Used in cross-stitch too, usually for outlines and detail lines added after the main stitching is done.
Each of these stitches has its own rhythm and best use. Rather than repeating a full how-to for every stitch here, I’ll point you to a dedicated guide where each one is broken down step by step: explore embroidery & cross-stitch techniques. That’s the best place to learn the exact hand movements and thread paths for each stitch.
Materials and Tools
You don’t need a large kit to start either craft. A small set of quality basics will get you through your first several projects.
| Item | Used For | Notes |
| Embroidery needle | Freehand embroidery | Sharp point, larger eye for thicker thread |
| Tapestry needle | Cross-stitch | Blunt tip, slides through fabric holes without splitting them |
| Embroidery hoop | Holding fabric taut | Wood or plastic, sized to your project |
| Fabric | The base for your stitching | Cotton or linen for embroidery, Aida cloth for cross-stitch |
| Embroidery floss (stranded cotton) | Stitching thread | Six loose strands you can separate for different thicknesses |
| Small, sharp scissors | Trimming thread | Keep these separate from fabric scissors if possible |
| Pattern or chart | Guiding your design | Printed, digital, or hand-drawn |
A few notes on choosing materials:
Embroidery floss, also called stranded cotton, is the most common thread for both crafts. It comes as six thin strands twisted together, and you can separate out however many strands you need. Most beginner projects use two or three strands at a time.
Aida cloth is graded by count, which tells you how many stitches fit per inch. A lower count, like 11 or 14, has larger, easier-to-see holes and is a good starting point. Higher counts pack in more detail but are harder on the eyes.
Embroidery hoops hold your fabric taut and even, which makes stitching easier and helps keep your tension consistent. They’re not strictly required for cross-stitch, but many beginners find them helpful there too.
A quick safety note: keep small, sharp scissors and needles stored somewhere secure when not in use, especially around young children, and always work in a well-lit space so you can see exactly where your needle is going.
How to Get Started
Getting started with either craft follows a similar basic sequence. Here’s a simple path from empty fabric to your first finished stitches.
- Pick your craft. If you like structure and following a chart, start with cross-stitch. If you like more freedom and want to try several stitch types, start with embroidery.
- Gather your basics. Fabric, needle, floss, small scissors, and a hoop if you’re using one.
- Prepare your fabric. Cut it a few inches larger than your finished design on each side, and consider a quick zigzag stitch or tape along the raw edges to stop fraying.
- Hoop your fabric. Loosen the hoop screw, place your fabric over the inner ring, press the outer ring down, then gently pull the fabric taut and tighten the screw.
- Thread your needle. Cut a length of floss around 18 inches long. Longer threads tend to tangle and fray more as you work.
- Start stitching. Follow your pattern or chart, working slowly at first. Focus on keeping your stitches even rather than fast.
- Secure your thread ends. Weave loose ends under a few stitches on the back of your work rather than tying tight knots, which can create lumps on the front.
- Finish and care for your piece. Once done, gently press the back of your work with a warm iron if needed, and consider framing or mounting your finished piece.
Tension is the quiet skill of needlework. Loose enough for the thread to glide, tight enough to hold its shape. Most beginner frustration doesn’t come from picking the wrong stitch. It comes from thread pulled too tight or too loose, and that only gets easier to feel with practice.
If you’re pressing finished fabric with an iron, keep the iron on a low to medium setting appropriate for your fabric type, and always test on a scrap piece first. Irons can scorch fabric quickly if left in one spot too long.
Pro Tips and Common Mistakes to Avoid
A few small habits make a big difference in how your stitching looks and feels.
- Don’t pull your thread too tight. Tight stitches pucker the fabric and pull it out of shape. Aim for stitches that lie flat without straining the fabric around them.
- Avoid threads that are too long. Anything over about 18 inches tends to tangle, fray, and knot more easily as you stitch.
- Watch your fabric grain. Stitching consistently in the same direction, especially with cross-stitch, keeps your finished piece looking neat and even.
- Don’t skip hooping. Fabric that isn’t held taut is much harder to stitch evenly, and it’s one of the most common reasons beginner work looks uneven.
- Match your needle to your fabric and thread. A needle that’s too thick can leave visible holes. One that’s too thin can be hard to thread and awkward to hold.
- Resist the urge to rush. In my experience, most stitching mistakes happen when you’re moving fast rather than when you’re missing a skill. Slowing down fixes more problems than any tool does.
A Note on Craft Wisdom
Every stitcher eventually learns the same lesson at their own pace.
“The fabric will forgive an uneven stitch long before you will.”
It’s a small reminder that this is a hobby meant to be enjoyed, not a test you can fail. Uneven stitches early on are part of learning, not a sign you’re doing it wrong.
Project Ideas to Try First
Once you know a few stitches or how to follow a basic chart, small projects are the best way to build confidence. Good first projects tend to be small, simple, and quick to finish, which keeps momentum high while you’re still learning.
Popular beginner-friendly options include small hoop art pieces, simple bookmarks, basic samplers that combine a few stitches, and small cross-stitch kits with pre-printed charts and included materials. Starting small also means less fabric and thread wasted if you need to unpick a section and try again, which almost everyone does at some point.
For a full list of beginner project ideas, including what materials each one needs and roughly how long they take, check out beginner embroidery & cross-stitch projects. That guide walks through specific project options in more detail than makes sense to repeat here.
Common Questions
What is the difference between embroidery and cross-stitch?
Embroidery is a broad craft that uses many different stitches placed freely to create a design. Cross-stitch is a specific type of embroidery that uses one repeated X-shaped stitch, worked from a counted chart onto even-weave fabric like Aida cloth. Cross-stitch is essentially one technique within the wider embroidery family.
Is embroidery hard to learn?
The basic stitches are simple to learn, and most beginners can stitch a recognizable shape within their first sitting. What takes more time to develop is even tension and steady hand movement, which come naturally with practice. Starting with two or three basic stitches, rather than trying to learn everything at once, makes the learning curve much easier.
What do I need to start embroidery?
At a minimum, you need fabric, an embroidery needle, embroidery floss, and small scissors. A hoop isn’t strictly required but makes stitching noticeably easier for most beginners. A simple traced or printed design gives you something to follow for your first project, so you’re not deciding placement from scratch.
Glossary and Quick Reference
Use this list to quickly look up terms used throughout this guide and across other embroidery and cross-stitch articles on this site.
EmbroideryThe broad craft of decorating fabric with needle and thread using a wide range of stitches.
Cross-stitchA counted embroidery technique using repeated X-shaped stitches worked from a chart.
Embroidery floss (stranded cotton)Thread made of six loose strands twisted together, which can be separated for different thicknesses.
Aida clothAn even-weave fabric with a clear, countable grid, commonly used for cross-stitch.
EvenweaveFabric woven with the same number of threads per inch in both directions, giving a consistent grid for counted stitching.
LinenA natural fabric sometimes used for both embroidery and cross-stitch, valued for its texture and durability.
Embroidery hoopA round or oval frame that holds fabric taut while stitching.
Tapestry needleA needle with a blunt tip, used in cross-stitch to avoid splitting fabric threads.
Chart (pattern)A grid-based guide showing where each stitch goes and which color thread to use.
Fabric countThe number of stitches per inch a piece of even-weave fabric supports, based on its weave.
Stitch countThe total number of stitches wide and tall in a finished design.
Full stitchA complete cross stitch, made of two crossed diagonal stitches.
Half stitchA single diagonal stitch, often used for shading.
Quarter stitchA partial stitch used for fine detail and curves.
BackstitchA solid line stitch used for outlines and detail, in both embroidery and cross-stitch.
French knotA small, raised knot stitch, often used for texture or small dots.
Satin stitchStraight stitches placed close together to fill a shape solidly.
Stem stitchA slightly twisted line stitch, often used for curved lines.
Chain stitchA looped stitch that connects like a chain, used for lines or fills.
Running stitchA simple, even line stitch, often the first one beginners learn.
TensionHow tightly or loosely thread is pulled through fabric, directly affecting how flat and even a finished stitch looks.
Where to Go From Here
Embroidery and cross-stitch share the same starting point: a needle, some thread, and a bit of patience while your hands learn the motion. From there, the two crafts branch out in their own directions, one built on stitch variety, the other on counted precision.
Pick whichever one appeals to you first. You can always try the other later, and many stitchers end up enjoying both. Keep your first projects small, expect a few uneven stitches along the way, and let your tension improve naturally with practice rather than trying to force it. You may check out our How to Get Started with Embroidery & Cross-Stitch post.
Leave a Reply