
I handed my nephew a finished flapping bird once, showed him how to pull the tail, and watched his face completely change when those wings actually flapped on their own. That reaction is exactly why the origami flapping bird tutorial remains one of the most requested folds I teach, and this guide walks through the entire process, from the base folds to getting those wings moving smoothly.
This tutorial is Part of Action Origami: Models That Move, and it covers how the flapping mechanism actually works, the full folding sequence, which paper gives the smoothest wing motion, and how this model compares in difficulty to the traditional crane.
What Is an Origami Flapping Bird?
The flapping bird is a traditional action origami model built from the same bird base used for the classic crane, but folded differently at the final stages to create a moving mechanism instead of a static shape. Pulling the bird's tail gently causes the wings to flap up and down, which is what separates action origami from purely decorative folds.
I've found that most folders come to this model already knowing the crane, and that familiarity actually helps, since the early folding stages are nearly identical. Where the flapping bird diverges is in how the final creases connect, turning what would be a fixed wing position into a hinge that moves.
This is a genuinely fun model to teach because the payoff is immediate and visible. There's no guessing whether you folded it correctly, since a properly folded bird flaps clearly the first time you try it.
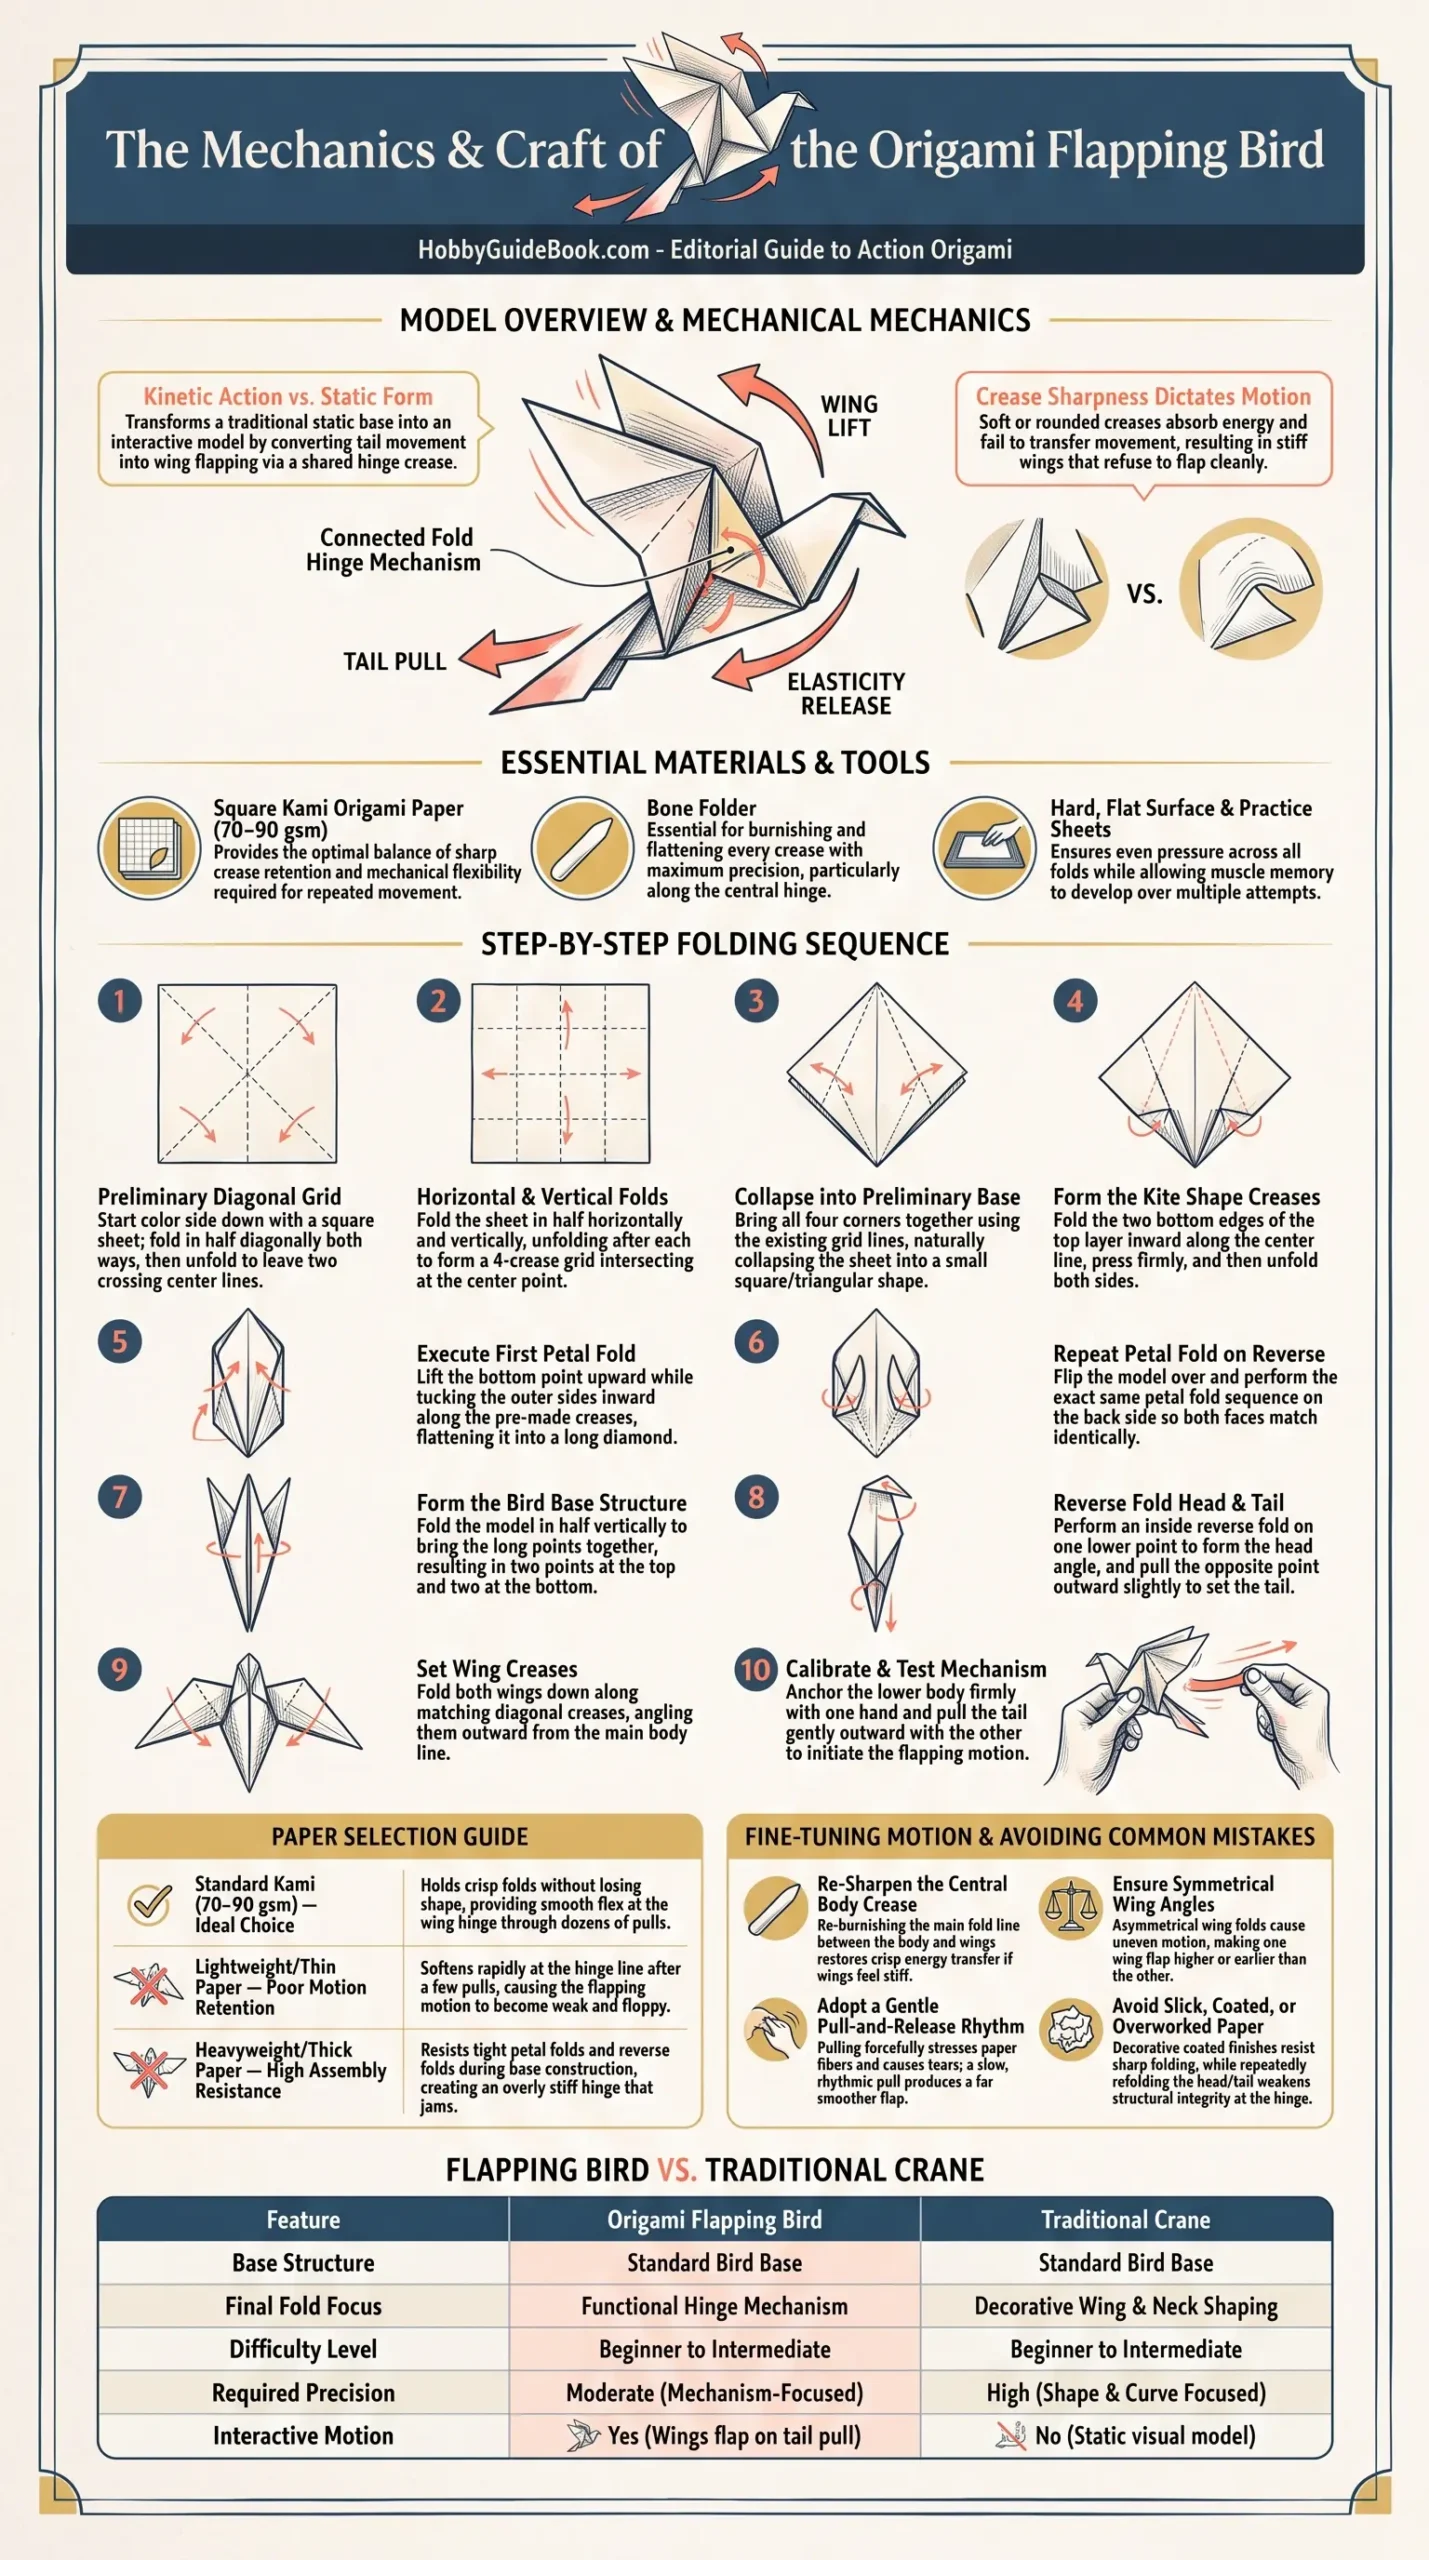
Photo Credit: Hobby Guidebook Editorial
Materials Needed for the Flapping Bird
A handful of supplies make folding and testing this model noticeably smoother, especially while you're still getting comfortable with the mechanism.
|
Item |
Purpose |
|
Square origami paper (kami, 70-90 gsm) |
Standard weight that creases sharply while staying flexible enough for the flapping motion |
|
Bone folder |
Sharpens every crease cleanly, which matters more here than in static models |
|
Flat, hard surface |
Keeps pressure even across each fold for crisp, accurate creases |
|
Extra practice sheets |
Lets you repeat the sequence a few times, since the base folds benefit from muscle memory |
How Does an Origami Flapping Bird Work?
The flapping mechanism relies on a simple but clever bit of paper engineering built into the bird base. Once the model is folded, the wings and tail are connected through a shared fold line at the body, so pulling the tail gently outward shifts that connection point and pushes the wings upward.
Releasing the tail lets the paper's natural spring bring the wings back down, and repeating that pull-and-release motion creates the flapping effect. What makes the bird's wings flap really comes down to this connected fold structure rather than any separate moving part, since the entire mechanism is built directly into the paper itself.
This is part of why crease sharpness matters so much for this model specifically. A softly creased connection point doesn't transfer motion cleanly, which often results in a bird that barely moves no matter how firmly you pull the tail.
How to Fold a Flapping Bird Step by Step
This sequence builds from the same bird base used in traditional crane folding, so the early steps may feel familiar if you've folded a crane before.
- Start with a square sheet, color side down, and fold it in half diagonally both ways, unfolding after each fold to leave two visible diagonal creases.
- Fold the paper in half horizontally and vertically, unfolding after each one, so you now have a grid of four creases crossing at the center.
- Collapse the paper into a preliminary base, bringing all four corners together using the creases you've already made, which should naturally fold into a smaller triangular shape.
- Fold the two bottom edges of the top layer inward, aligning them with the center line to create a kite shape, then unfold both folds.
- Perform a petal fold by lifting the bottom point up while pressing the sides inward along your existing creases, flattening the paper into a diamond shape with a new point at the top.
- Repeat the petal fold on the reverse side, flipping the model over and completing the same fold sequence so both sides match.
- Fold the model in half vertically, bringing the two long points together to form the bird base, with two points on one end and two points on the other.
- Choose one end for the head and tail, folding one point up at an angle using an inside reverse fold to create the head, and pulling the other point out slightly to form the tail.
- Fold the wings down on both sides, angling them outward from the body along a diagonal crease, which completes the basic shape of the bird.
- Test the mechanism by holding the body firmly and pulling the tail gently outward, watching the wings lift as you pull and lower as you release.
If a step in this sequence feels unfamiliar, particularly the petal fold or inside reverse fold, it helps to slow down and revisit those fold types individually before continuing. Origami Techniques Explained breaks down exactly how each of these foundational folds works, which makes multi-step models like this one much easier to follow.

Photo Credit: KATRIN BOLOVTSOVA
What Paper Works Best for a Flapping Bird?
Paper choice affects this model more than it does many static folds, since the flapping motion depends on the paper holding its shape through repeated movement. Standard kami paper around 70 to 90 gsm tends to work best, offering enough crispness to hold sharp creases while staying flexible enough to flex smoothly at the wing hinge.
Paper that's too thin often loses its shape quickly after just a few flaps, softening at the fold points until the motion becomes weak or inconsistent. Paper that's too thick, on the other hand, resists the petal folds and inside reverse folds required earlier in the sequence, making the base itself harder to form cleanly.
A mid-weight square sheet, somewhere between typical printer paper and lightweight cardstock, tends to strike the right balance for most folders working on their first few flapping birds.
How Do You Improve the Bird's Wing Movement?
A few adjustments make a noticeable difference once the basic fold is complete and the wings still feel stiff or uneven.
- Sharpen the connecting crease at the body. This fold line is doing most of the mechanical work, and a soft crease here weakens the entire flapping motion.
- Check that both wings are folded at matching angles. Uneven wing angles cause one side to flap more than the other, which looks lopsided even when the mechanism technically works.
- Pull the tail gently, not forcefully. Yanking too hard can stress the connecting crease and eventually cause it to tear or lose its sharp fold.
- Re-crease the wing folds after several flaps. Repeated motion naturally softens paper over time, and a quick re-crease restores crisper movement.
- Practice the pull-and-release rhythm slowly. A smooth, even pull tends to produce a cleaner flap than a quick, jerky motion.
A folding instructor I once learned from during a beginner workshop described the flapping bird's tail pull as a conversation with the paper rather than a tug, since forcing the motion too hard tends to fight against the crease instead of working with it. That description stuck with me, since slowing my own pull motion down noticeably smoothed out the flap on birds that had felt stiff before.
Is the Flapping Bird Harder to Fold Than a Crane?
The flapping bird and the traditional crane share nearly identical early steps, both starting from the same bird base built through a preliminary base and a pair of petal folds. Where they differ is in the final stages, and that's really where the difficulty comparison comes down to.
The crane's final folds are somewhat more delicate, particularly shaping the wings and neck into their finished curved position, which takes a bit more precision. The flapping bird's final folds are more mechanically focused, prioritizing a functional hinge over decorative shaping, which some folders actually find more forgiving since minor asymmetry doesn't affect whether the mechanism works.
In my experience teaching both models, the flapping bird tends to feel slightly more approachable for total beginners specifically because the reward is functional rather than purely visual. A slightly uneven crane still needs to look right, while a slightly uneven flapping bird just needs to flap, and that lower bar for a satisfying result makes it a great model for building early confidence.
Photo Credit: Miguel Á. Padriñán
Comparing the Flapping Bird and the Traditional Crane
|
Feature |
Flapping Bird |
Traditional Crane |
|
Base structure |
Bird base |
Bird base |
|
Final fold focus |
Functional hinge mechanism |
Decorative wing and neck shaping |
|
Difficulty level |
Beginner to intermediate |
Beginner to intermediate |
|
Precision needed |
Moderate, mechanism-focused |
Higher, shape-focused |
|
Interactive element |
Yes, wings flap when tail is pulled |
No, static once folded |
Common Mistakes When Folding a Flapping Bird
A few habits tend to slow down or weaken the final flapping motion for folders working through this model for the first time.
- Rushing the petal fold stage. This step sets up the entire base structure, and an uneven petal fold on either side throws off symmetry throughout the rest of the model.
- Softening creases while adjusting the head and tail. Repeatedly reopening and refolding these points to get the angle right can weaken the paper right where the mechanism needs it most.
- Skipping the test pull until the very end. Testing the flap partway through, right after completing the wing folds, catches mechanism problems while they're still easy to fix.
- Using paper with a slick or coated finish. Some decorative papers resist holding sharp creases at the connecting fold, weakening the flap even when every step was folded correctly.
Once the flapping bird feels comfortable, exploring other action models is a natural next step, since the folding logic behind moving mechanisms carries over well between models. Jumping Frog Tutorial covers a different action mechanism entirely, relying on a folded spring rather than a hinge, which makes a great comparison once you understand how the flapping bird's motion works.
Frequently Asked Questions
How does an origami flapping bird work? Pulling the bird's tail shifts a connected fold at the body, which pushes the wings upward, and releasing the tail allows the paper's natural spring to lower them again.
What makes the bird's wings flap? A shared crease connecting the tail, body, and wings acts as a built-in hinge, so movement at the tail transfers directly into movement at the wings.
What paper works best for a flapping bird? Standard kami paper around 70 to 90 gsm works well, holding sharp creases while staying flexible enough for smooth, repeated wing movement.
How do you improve the bird's wing movement? Sharpen the connecting crease at the body, keep both wings folded at matching angles, and pull the tail gently rather than forcefully.
Is the flapping bird harder to fold than a crane? Both share the same base and similar difficulty overall, though the crane requires more precise shaping while the flapping bird focuses more on a functional mechanism.
Final Thoughts
The flapping bird takes the familiar crane base and turns it into something genuinely fun to hand someone, since watching those wings move never really gets old. Fold the base carefully, sharpen that connecting crease, and a smooth, satisfying flap is well within reach even on your first attempt.
If you're ready to explore the rest of what this hobby has to offer, Read the full origami guide for everything from paper choices to techniques across every skill level.




Leave a Reply