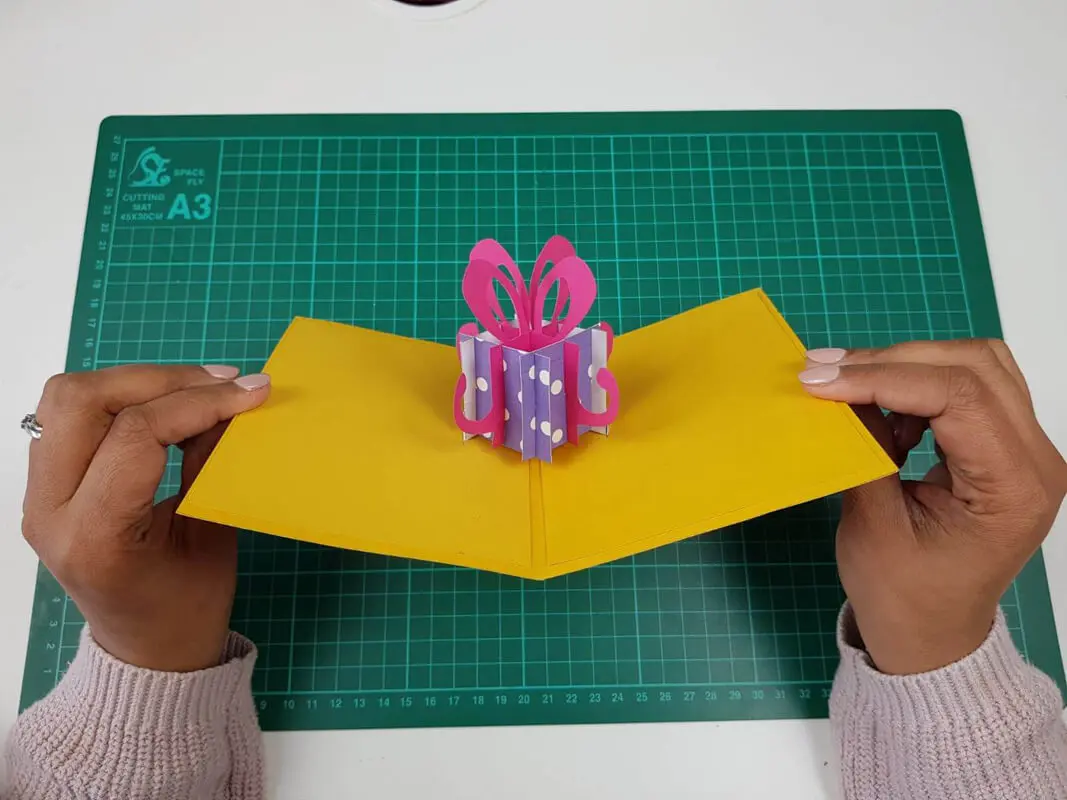
I once handed someone a flat, plain looking card, and watched their face completely change the second they opened it and a tiny building rose straight up off the page. That reaction is the whole reason I keep coming back to the kirigami pop-up card technique, a method that uses precise cuts and folds together to make paper spring into three dimensional shapes the instant a card opens.
In this guide, you'll learn exactly how the pop-up effect works, which cuts and folds create it, what paper holds up best, and how to plan your own design instead of relying only on templates.
This technique is Part of Kirigami: Origami with Cutting, the branch of paper folding that allows careful cutting alongside folding, unlike traditional origami, which sticks strictly to folds alone.
What Is the Kirigami Pop-Up Card Technique?
Kirigami sits right next to origami, sharing the same folding foundation, but it adds one key difference, controlled cutting. Where traditional origami relies purely on hand folds with no cuts at all, kirigami uses precise slits and cutouts to unlock shapes that folding alone simply can't create.
The pop-up card technique specifically combines short, strategic cuts with mountain and valley folds so that opening the card physically pushes a shape upward or outward. It's genuinely satisfying to design, since you're essentially building a small paper machine that only works when every cut and fold lines up correctly.
Why this technique stands out from basic card folding:
- Creates real dimension, giving flat paper visible depth and movement
- Uses simple tools, nothing beyond a blade, ruler, and folding tool
- Rewards careful planning, since success depends on precise cut and fold placement
- Scales from beginner to advanced, starting with simple boxes before moving into layered scenes
What You'll Need
This project uses a short, focused tool list, but precision with each item matters more here than in most folding-only projects.
|
Item |
Why It Matters |
|
Cardstock, 65 to 110 lb weight |
Sturdy enough to hold pop-up shapes without collapsing |
|
A sharp craft knife |
Creates clean, precise cuts along fold lines |
|
A metal ruler |
Guides straight cuts and helps keep folds accurate |
|
A self-healing cutting mat |
Protects your work surface and keeps blade cuts consistent |
|
A bone folder |
Presses folds sharp, which strengthens the final pop-up motion |
|
A pencil and eraser |
Useful for lightly marking cut and fold lines before committing |
What paper is best for kirigami pop-up cards? I'd steer folders toward medium weight cardstock, somewhere around 80 lb. Paper this thick holds a crease well and supports the weight of a raised shape, while paper any lighter tends to sag or collapse once the card opens.
How to Make a Basic Pop-Up Cut and Fold
This step by step walks through a simple centered pop-up box shape, a great starting project before moving into more complex layered designs.
- Fold your cardstock in half, creasing firmly with a bone folder to create a clean center line.
- Measure and lightly mark two parallel cut lines, evenly spaced from the center fold, using your pencil and ruler.
- Cut along both marked lines with your craft knife, cutting only through the fold, not the entire card. Keep fingers well clear of the blade path and always cut away from your body on the mat.
- Fold the cut section forward, creasing a new fold line that connects the two cut points, then fold it back the opposite direction to create a reverse crease.
- Open the card gently, pushing the cut section outward so it pops forward into a raised box shape.
- Close the card carefully, tucking the popped section inward so it folds flat again without creasing incorrectly.
- Reinforce all creases by running your bone folder along each line again, since sharper creases create smoother, more reliable pop-up motion.

Photo Credit: Hobby Guidebook Editorial
How Does a Kirigami Pop-Up Card Work?
The mechanism behind every pop-up card comes down to a simple idea, cuts create free edges, and folds direct how those edges move. When you cut a slit into folded paper, you're creating a section that's no longer attached to the surrounding card along that edge.
That freed section can then fold independently, following whatever crease pattern you build around it. As the card opens, the main fold pulls outward, and the connected pop-up section has nowhere to go but forward, creating that signature raised effect.
The two main forces at play:
- The main spine fold, which opens and closes the whole card, driving the motion
- The internal pop-up folds, angled so they physically push the cut section outward as the spine opens
Understanding this relationship is honestly the biggest turning point for most beginners. Once you see cuts and folds as working together rather than separately, designing your own pop-up shapes becomes far less mysterious.

Photo Credit: Vitalii Abakumov
How Do You Plan Folds and Cuts for a Pop-Up Card?
Planning ahead saves an enormous amount of frustration with this technique, since cutting first and figuring out folds later almost never works cleanly. I've found the strongest results come from sketching the whole design flat before touching a blade at all.
A simple planning process that works well:
- Sketch your card flat and open, roughly drawing where you want the raised shape to sit.
- Mark the spine fold first, since every other fold and cut gets measured relative to this center line.
- Decide your cut lines, keeping them parallel and evenly spaced for a clean, symmetrical pop-up.
- Map your internal fold angles, since the angle directly controls how far and how straight the shape pops forward.
- Test on scrap paper first, always, before committing to your final cardstock.
Can you design a pop-up card without a template? Yes, absolutely, once you understand this basic spine and cut relationship. Most experienced kirigami folders eventually move away from templates entirely, sketching directly onto their cardstock instead.
If you want to build on this skill further, the Layered Kirigami Technique is a natural next step, stacking multiple cut layers to build scenes with real depth rather than a single raised shape.
Pro Tips and Common Mistakes to Avoid
A handful of small habits separate a smooth, reliable pop-up from one that jams or tears.
- Always cut on a self-healing mat. Cutting directly on a table dulls blades fast and risks damaging the surface underneath.
- Keep cuts shorter than you think you need. Overcutting weakens the card and can tear the pop-up section loose entirely.
- Crease before you cut whenever possible. Pre-creasing gives the paper a clear path to follow once cuts are made.
- Watch your blade angle closely. A slightly angled cut creates uneven edges that throw off the whole pop-up motion.
- Replace dull blades often. A dull blade drags paper instead of slicing it cleanly, increasing the chance of a slip.
As paper crafters often say, the fold decides the shape, but the cut decides whether it moves at all.
With pop-up cards specifically, that balance matters more than almost anywhere else in the craft. A perfect fold with a sloppy cut simply won't spring the way it should.
For a broader look at foundational techniques worth pairing with this one, including reverse folds and accordion pleating, Origami Techniques Explained breaks each core method down individually.
Photo Credit: Ron Lach
Kirigami vs Traditional Origami Folding
Since kirigami leans on tools that traditional origami never touches, it's worth seeing the two side by side.
|
Feature |
Traditional Origami |
Kirigami Pop-Up Technique |
|
Cutting allowed |
No |
Yes, precise and controlled |
|
Tools needed |
Just paper |
Blade, ruler, mat, bone folder |
|
Complexity source |
Fold sequence |
Cut and fold combination |
|
Common results |
Cranes, boxes, flowers |
Cards, scenes, dimensional shapes |
Frequently Asked Questions
How does a kirigami pop-up card work? Cuts free a section of paper along one edge, and surrounding folds direct that freed section to pop outward as the card opens.
What cuts create a pop-up effect? Short, parallel slits placed along the fold line, paired with an internal reverse fold, create the classic pop-up motion.
How do you plan folds and cuts for a pop-up card? Sketch the design flat first, mark your spine fold, plan cut placement and angles, then test everything on scrap paper before your final piece.
What paper is best for kirigami pop-up cards? Medium weight cardstock, around 80 lb, holds creases well and supports raised shapes without sagging or collapsing.
Can you design a pop-up card without a template? Yes, once you understand how spine folds and cuts work together, many folders sketch original designs directly onto their cardstock.
Final Thoughts
The kirigami pop-up card technique turns a flat sheet into something that genuinely surprises whoever opens it. Start with a simple centered box shape, get comfortable with clean cuts and sharp creases, and you'll be sketching your own original pop-up designs before long.
Ready to explore more cutting and folding techniques? Read the full origami guide for other methods and projects worth trying next.





Leave a Reply